Mama's Little Boy Album & Holder by Sherry WrightSupplies:
 Scor-Pal (Temporarily out of stock)
Instructions:* Ink all edges. Cut photo mats from cardstock to desired size.
* Make additional album pages by cutting coordinating patter paper 5" x 4 1/2".
1. Begin with front of album cut chipboard banner to fit and add to top. Adhere 3-d cloud and sun sticker as shown. From chipboard sheet add "mama's little" and "boy", finish with a button on left side.

2. On page one use letter stickers to spell child's name, add star and "one in a million" sticker from chipboard sheet.
3. On page two cut photo mat and add star from chipboard sheet and "you mean the world to me" from 3-d sticker sheet.

4. On page three cut photo mat, add star and cloud from chipboard sheet.
5. For filler page to add journaling mat lined chipboard sticker from chipboard sheet.
6. On page four cut photo mat and add owl and tab from from 3-d sticker sheet.


7. On page five cut photo mat and add "cute" banner from 3-d sticker sheet and buttons.
8. Cut two pieces of pattern paper to tag size to add journaling. Punch holes and add borders from chipboard sheet.

9. On page six use kraft envelope and add sun & clouds from chipboard sheet. Spell "firsts" and cut lined pattern paper to fit in envelope to record firsts.

10.On page seven (back of envelope) cut photo mat and add chipboard border and tab from chipboard sheet.
11. On page eight cut photo mat and add chipboard star from photo mat.

12. On page nine cut photo mat and add chipboard tab and circle from chipboard sheet.
13. Use kraft envelope for page ten and adhere two owls (cut bow off yellow owl) and chipboard border from chipboard sheet.

14. On page eleven cut photo may and add chipboard button with tied twine through holes.
15. On page twelve cut photo mat and add chipboard banner from chipboard sheet.

16. Cut photo mat and embellish. For last page this will be from the chipboard album package. Add 3-d star to circel tab.
Tips: Continue cutting pages to make album as big as you like.
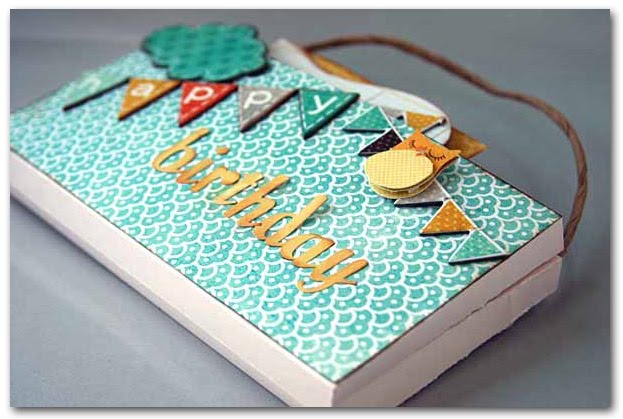
For holder:
1. Using Scor-Pal or other scoring tool score carstock as shown in photo. Fold into pocket shape adhering all edges.


2. Cut a piece of coordinating pattern paper to fit front and back of pocket. Add "Happy" banner from chipboard sheet and spell "birthday" using alphabet.
3. Add cloud and small banner from chipboard sheet and owl (cut off bow) from 3-d sticker sheet.
4. Cut handle off kraft gift bag nd attach to your pocket and add album.

Tip: Make this same album for a girl using
My Mind's Eye Fine Dandy Tickled Pink.
-

 Thanks Card by Anabelle O'Malley